


The following is a look at the features and functions of the digital instrument cluster on your Polaris RANGER, ACE, Sportsman or Scrambler. Some features are not applicable to all models.
Note that the use of a high pressure washer may damage the instrument cluster. Wash the vehicle by hand or with a garden hose, using mild soap. Do not use alcohol to clean the instrument cluster. Do not allow insect sprays to contact the lens. Immediately clean off any gasoline that splashes on the instrument cluster.
For more information on cleaning your Polaris Off-Road Vehicle, listen to the Cleaning: It's Not Just About Looking Good episode of the Polaris Podcast.
Overview

The Gear Indicator (1) displays gear shifter position. It will show one of six symbols:
- H = High Gear
- L = Low Gear
- N = Neutral
- R = Reverse Gear
- P = Park
- - = Gear Signal Error (or shifter is between gears)
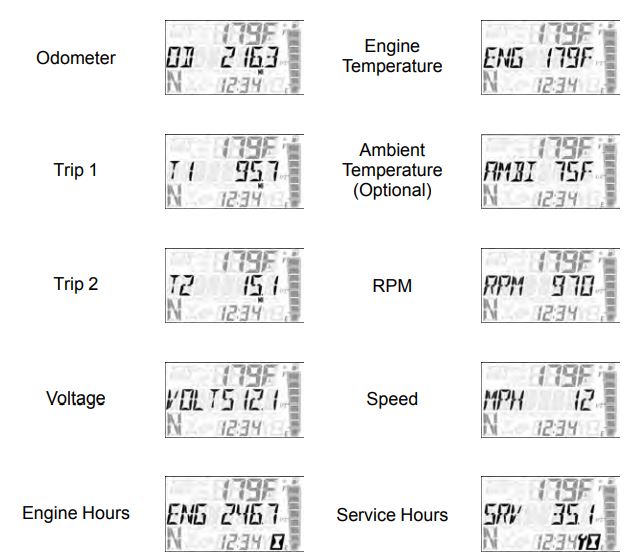
Display Area 2 (2) displays the odometer, trip meter, trip meter 2, trip timer, voltage, engine temperature, engine hour meter, programmable service hour interval, ground speed or engine RPM.
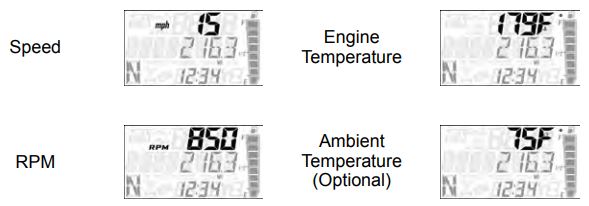
Display Area 1 (3) displays engine RPM, ground speed or coolant temperature.
The Fuel Gauge (4) shows the level of fuel in the fuel tank. When the last segment clears, a low fuel warning is activated. All segments, including the fuel icon, will flash. Refuel immediately.
On the Service Indicator (5), a flashing wrench symbol alerts the operator that the preset service interval has been reached and your vehicle is due for scheduled maintenance. Your Polaris Dealer can provide scheduled maintenance. For more information, see the Periodic Maintenance Chart section of your Owner's Manual.
The Clock (6) displays time in a 12-hour or 24-hour format. See below for more information on setting the time.
On the AWD Indicator (7), segments of the indicator illuminate based on the drive mode that's engaged.
Indicator Lamps

| 1 | Check Engine |  | This indicator appears if an EFI-related fault occurs. Do not operate the vehicle if this warning appears. Serious engine damage could result. Your authorized Polaris Dealer can assist. |
| 2 | EPS Warning (if equipped) |  | Illuminates when a fault has occurred in the EPS system. Your authorized Polaris Dealer can assist. EPS operation is possible with key on/engine off for up to 5 minutes. |
| 3 | Engine Hot |  | This lamp illuminates to indicate an overheated engine. If the indicator flashes, a severe overheating condition exists. |
| 4 | Neutral |  | This lamp illuminates when the transmission is in neutral and the ignition key is in the ON position. |
| 5 | Helmet or Seat Belt |  | This lamp flashes for several seconds when the key is turned to the ON position. The lamp is a reminder to wear helmet and seat belt (if equipped) before operating. |
| 6 | High Beam |  | This lamp illuminates when the headlamp switch is set to high beam. |
| 7 | Chassis Fault |  | If applicable. |
| 8 | Performance Limited |  | On models equipped with a low speed limiter, indicator light will remain on when low speed limiter is active. For more on the speed limiter, see below. |
Display Area 1
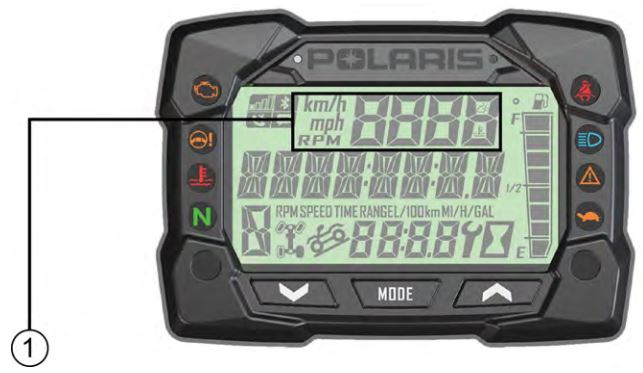
Pressing the MODE button will change the information displayed in Area 1.
Display Area 2
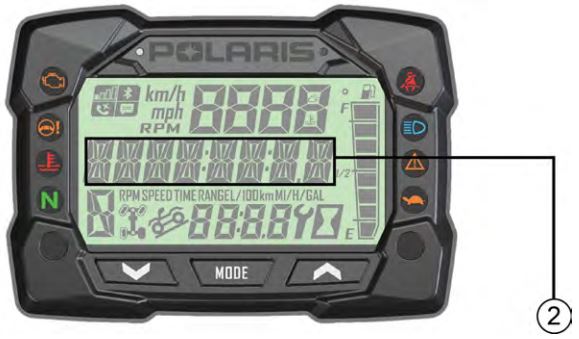
Toggle the Up/Down buttons to change the information displayed in Area 2.
TT will display when the trip timer is shown on the gauge. Press and hold the UP or DOWN button to reset the trip timer.
To reset the trip meters, toggle to the meter you want to reset. Then press and hold the UP or DOWN button.
Note that when viewing the engine hours, the hourglass icon (shown below) will appear in the bottom-right-hand corner of the display. When the hourglass icon and the wrench icon are both illuminated, this indicates you are viewing the service hours. The service timer displays engine hours remaining until the vehicle requires service.

When the icon depicting an ATV going downhill (shown below) appears, it means Active Descent Control is active on equipped models.

Options Menu

Press and hold the MODE button to enter the Options Menu.
| Options Menu | Notes |
| Diagnostic Codes | Only displays if fault codes are present or stored |
| Units - Distance | Select MPH or KPH |
| Units - Temp | Select between degrees F and C |
| Clock | Select between 12H or 24 H and set time |
| Back Light Color | Select between Blue or Red |
| Back Light Level | Set back light brightness level |
| Service Hours | View/set service hours |
| Exit Menu | Exit |
Unit Selection Distance
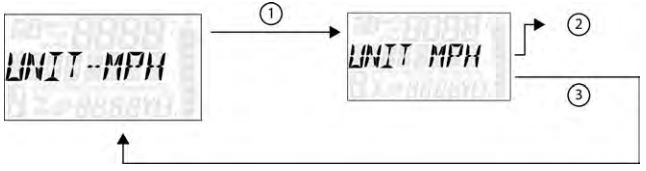
1. Press and hold the MODE button to enter the Options Menu. "OPTIONS" will display on the screen for 3 seconds before showing the first menu item.
2. Select "Units-Distance" from the Options Menu by pressing the MODE button.
Reference the image shown above:
- (1) Press the MODE button.
- (2) Toggle the Up/Down buttons to change the units (MPH or KPH).
- (3) With the correct unit displayed, press the MODE button, which will set the unit and return to the Options Menu.
3. To exit the Options Menu, the user can select the Exit Menu function from the Options Menu; can hold the MODE button and exit out of the Options Menu; or not press any button for 10 seconds, which will exit out of the Options Menu.
Unit Selection Temperature

1. Press and hold the MODE button to enter the Options Menu. "OPTIONS" will display on the screen for 3 seconds before showing the first menu item.
2. Select "Units-Temp" from the Options Menu by pressing the MODE button.
Reference the image shown above:
- (1) Press the MODE button.
- (2) Toggle the Up/Down buttons to change the units (F or C).
- (3) With the correct unit displayed, press the MODE button, which will set the unit and return to the Options Menu.
3. To exit the Options Menu, the user can select the Exit Menu function from the Options Menu; can hold the MODE button and exit out of the Options Menu; or not press any button for 10 seconds, which will exit out of the Options Menu.
Clock
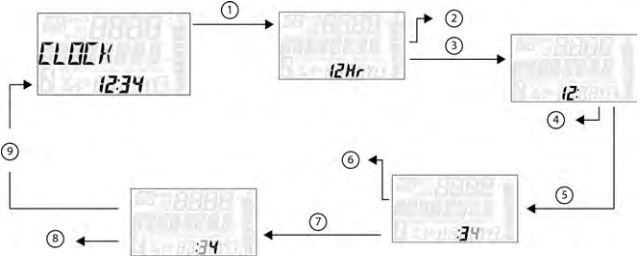
1. Press and hold the MODE button to enter the Options Menu. "OPTIONS" will display on the screen for 3 seconds before showing the first menu item.
2. Select "Clock" from the Options Menu.
Reference the image shown above:
- (1) Press the MODE Button
- (2) Toggle the Up/Down buttons to change the units (12 hours or 24 hours).
- (3) With the correct unit displayed, press the MODE button, which will set the unit.
- (4) Toggle the Up/Down buttons to change the units (cycles hours).
- (5) With the correct unit displayed, press the MODE button, which will set the unit.
- (6) Toggle the Up/Down buttons to change the units (cycles 10s of minutes).
- (7) With the correct unit displayed, press the MODE button, which will set the unit.
- (8) Toggle the Up/Down buttons to change the units (cycles 1s of minutes).
- (9) With the correct unit displayed, press the MODE button, which will set the unit and return to the Options Menu.
3. To exit the Options Menu, the user can select the Exit Menu function from the Options Menu; can hold the MODE button and exit out of the Options Menu; or not press any button for 10 seconds, which will exit out of the Options Menu.
Back Light Color
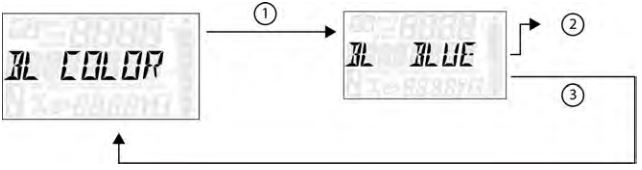
1. Press and hold the MODE button to enter the Options Menu. "OPTIONS" will display on the screen for 3 seconds before showing the first menu item.
2. Select "Backlight Color" from the Options Menu by pressing the MODE button.
Reference the image shown above:
- (1) Press the MODE button.
- (2) Toggle the Up/Down buttons to change the units (Blue or Red).
- (3) With the correct unit displayed, press the MODE button, which will set the unit and return to the Options Menu.
3. To exit the Options Menu, the user can select the Exit Menu function from the Options Menu; can hold the MODE button and exit out of the Options Menu; or not press any button for 10 seconds, which will exit out of the Options Menu.
Back Light Level
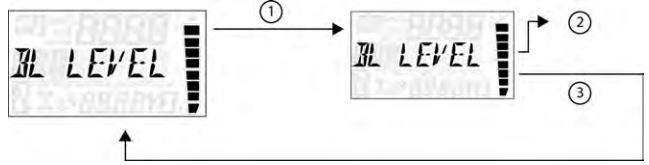
1. Press and hold the MODE button to enter the Options Menu. "OPTIONS" will display on the screen for 3 seconds before showing the first menu item.
2. Select "Backlight Level" from the Options Menu by pressing the MODE button.
Reference the image shown above:
- (1) Press the MODE button.
- (2) Toggle the Up/Down buttons to change the units (increase or decrease level).
- (3) With the correct unit displayed, press the MODE button, which will set the unit and return to the Options Menu.
3. To exit the Options Menu, the user can select the Exit Menu function from the Options Menu; can hold the MODE button and exit out of the Options Menu; or not press any button for 10 seconds, which will exit out of the Options Menu.
Service Hours
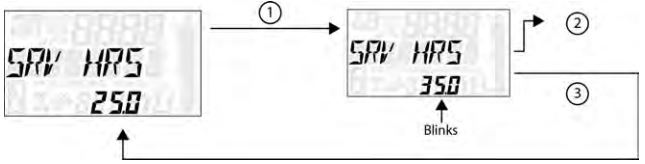
1. Press and hold the MODE button to enter the Options Menu. "OPTIONS" will display on the screen for 3 seconds before showing the first menu item.
2. Press the MODE button to select "Service Hours" from the Options Menu. This tells you how many engine hours are remaining before your vehicle requires maintenance.
Reference the image shown above:
- (1) Press the MODE button.
- (2) Toggle the Up/Down buttons to change the units (0, 5, 10, -95, 100).
- (3) With the correct unit displayed, press the MODE button, which will set the unit and return you to the Options Menu.
To reset service hours after they have counted down to "0.0," reselect the existing setpoint or select a new service hour value.
3. To exit the Options Menu, the user can select the Exit Menu function from the Options Menu; can hold the MODE button and exit out of the Options Menu; or not press any button for 10 seconds, which will exit out of the Options Menu.
Diagnostic Code
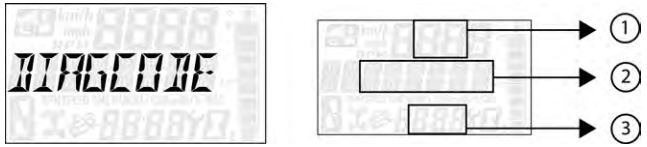
The Diagnostic Code Screen will show available MIL that have come on during that ignition cycle.
1. Press and hold the MODE button the enter the Options Menu. "OPTIONS" will display on the screen for 3 seconds before showing the first menu item.
2. Select "Diagnostic Codes" from the Options Menu by pressing the MODE button. Toggle the Up/Down buttons to cycle through the codes. This option only will be available if a fault code was set or is active during the current ignition key "ON" cycle. Turning off the ignition will clear any saved fault codes from the garage.
Reference the image shown above:
- (1) Area A will display FMI.
- (2) Area B will display SPN.
- (3) The Clock Area will display the count.
3. To exit the Options Menu, the user can select the Exit Menu function from the Options Menu; can hold the MODE button and exit out of the Options Menu; or not press any button for 10 seconds, which will exit out of the Options Menu.
For more information on diagnostic codes and display code definitions for your vehicle, contact your Polaris Dealer.
Low Speed Limiter
Model year 2020 and older Sportsman 450 and 570 Utility Edition models are equipped with a Variable Low Speed Limiter. This feature limits how fast the vehicle can go (7-14 mph) and is used when mowing, towing, plowing, spraying or doing other low speed work. When this feature is enabled, the indicator light on the right-hand side of the console will illuminate a turtle icon. Watch Enabling and Disabling the Variable Low Speed Limiter for a demonstration.
Using Bluetooth® (If Equipped)
Certain Sportsman and ACE models come equipped with Bluetooth® capabilities. Watch the following video and skip to 2:40 for more on how to connect to a Bluetooth®-enabled gauge.
On some model year 2021 and newer Sportsman models, you can use Bluetooth® and the Polaris App to do things like create geofences and set speed limits on your ATV. For more on that, read Using Geofences and Speed Limits on Your ATV. To learn more about the available features on your RANGER 150 youth vehicle, read RIDE COMMAND for Your RANGER 150.
For more on your Polaris Off-Road Vehicle, consult your Owner's Manual.
Bluetooth® is a registered trademark of Bluetooth Sig, Inc.
YouTube® is a registered trademark of Google LLC
Unless noted, trademarks are the property of Polaris Industries Inc.
© 2022 Polaris Inc.


