


Some Polaris ATV, ACE, RANGER and RZR models are equipped with analog instrument clusters that include a 2-inch LCD digital display. Some features will vary from model to model.
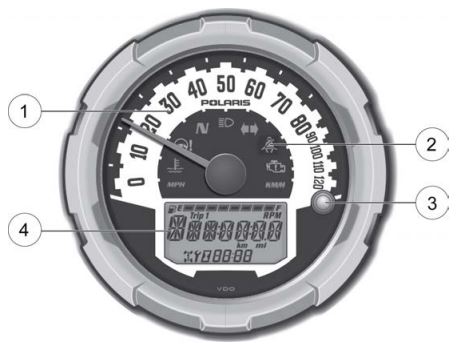
These instrument clusters include a speedometer (1), indicator lamps (2), mode button (3) and rider information center (4).
Indicator Lamps
| Lamp | Indicates | Condition |
 | Vehicle Speed | When standard mode is selected, speed displays in miles per hour. When metric mode is selected, speed displays in kilometers per hour. |
 | Over Temperature | Illuminates to indicate an overheated engine. If the indicator flashes, the overheating condition remains, and the system automatically will reduce engine power. |
 | Electric Power Steering (EPS) Warning (if equipped) | Illuminates briefly when the key is turned to the ON position. If the light remains on, the EPS system is inoperative. Your Polaris Dealer can assist. |
 | Neutral | Illuminates when the transmission is in neutral and the ignition key is in the ON position. |
 | High Beam | Illuminates when the headlamp switch is set to high beam. |
 | Helmet/ Seat Belt (if equipped) | A reminder to the operator to ensure all riders are wearing helmets and seat belts before operating. The driver's seat belt is equipped with a seat belt interlock. Vehicle speed will be limited to 15 mph (24 km/h) if the seat belt is not secured. |
 | Check Engine | Appears if an Electronic Fuel Injection (EFI) related fault occurs. Do not operate the vehicle if this warning appears. Serious engine damage could result. Your Polaris Dealer can assist. |
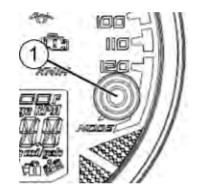
Mode Button
The mode button (1) is located near or on the instrument cluster. Use this button to toggle through the mode options available.
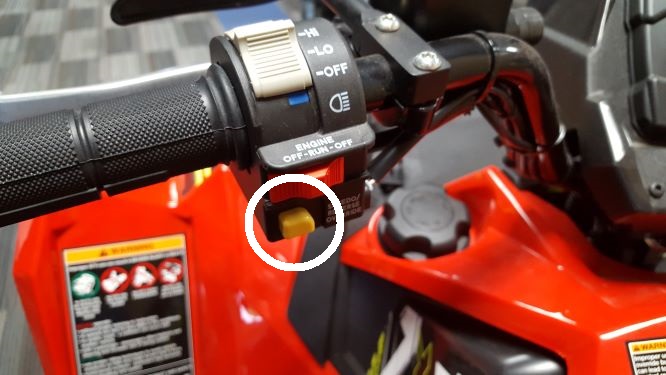
For ATVs that don't have a mode button on the cluster, the reverse override switch on the left handlebar (pictured below) acts as the mode button when held down for approximately one half-second. The override button will not function as a mode button if the transmission is in reverse.
Rider Information Center
The rider information center is located in the instrument cluster. All segments will light up for one second at start-up. If the instrument cluster fails to illuminate, a battery over-voltage may have occurred, and the instrument cluster may have shut off to protect the electronic speedometer. If this occurs, your Polaris Dealer can provide a proper diagnosis.
The information center is set to display standard units of measurement and a 12-hour clock at the factory. The functions and features of the rider information center are shown in the diagram and table below.
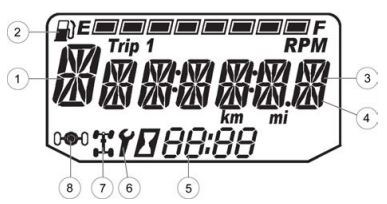
| 1 | Gear Indicator | Displays gear shifter position. |
| 2 | Fuel Gauge | The segments of the fuel gauge show the level of fuel in the fuel tank. When the last segment clears, a low fuel warning is activated. All segments, including the fuel icon, will flash. Refuel immediately. |
| 3 | Information Display Area | Displays odometer, trip meter, engine hour meter and programmable service hour interval. |
| 4 | Under/Over Voltage | This warning usually indicates that the vehicle is operating at an RPM too low to keep the battery charged. It also may occur when the engine is at idle and high electrical load (lights, cooling fan, accessories) is applied. Drive at a higher RPM or recharge the battery to clear the warning. |
| 5 | Clock | Displays time in a 12-hour or 24-hour format. |
| 6 | Service Indicator | A flashing wrench symbol alerts the operator that the preset service interval has been reached. Your Polaris Dealer can provide scheduled maintenance. |
| 7 | 4x4 Indicator | Illuminates when the 4x4 system is engaged (switch is on 4x4, AWD or ADC 4x4). |
| 8 | Turf Mode Indicator (if equipped) | Illuminates when the operator unlocks the differential. |
Display Units
The display can be changed to display either standard or metric units of measurement. Use the mode button to toggle through the mode options available. To exit the set-up mode at any time, wait 10 seconds. The display automatically exits and returns to the odometer display.
| Measurement | Standard | Metric |
| Distance | Miles | Kilometers |
| Fuel | U.S. Gallons | Liters, Imperial Gallons |
| Temperature | Fahrenheit | Celsius |
| Time | 12-Hour Clock | 24-Hour Clock |
To change the display units, do the following:
1. Turn the key to the OFF position.
2. Press and hold the MODE button while turning the key to the ON position.
3. When the display flashes the distance setting, tap the MODE button to advance to the desired setting.
4. Press and hold the MODE button to save the setting and advance to the next display option.
5. Repeat the procedure to change the remaining display settings.
Clock Mode
The clock must be reset any time the battery has been disconnected or discharged. To set the clock time, do the following:
1. Turn the key to the ON position. Use the MODE button to toggle to the odometer display.
2. Press and hold the MODE button until the hour segment flashes. Release the button.
3. With the segment flashing, tap the MODE button to advance to the desired setting.
4. Press and hold the MODE button until the next segment flashes. Release the button.
5. Repeat steps 3-4 to set the 10-minute and 1-minute segments. After completing the 1-minute segment, step 4 will save the new settings and exit the clock mode.
6. Turn the key to the OFF position.
Odometer Mode
The odometer records and displays the distance traveled by the vehicle.
Trip Meter Mode
The trip meter mode records the distance traveled by the vehicle if reset before each trip. To reset, select the trip meter mode. Press and hold the MODE button until the meter resets to zero. In the rider information center, the trip meter display contains a decimal point, but the odometer displays without a decimal point.
Engine Hour Mode
If equipped, this screen displays total logged hours of engine operation. An hourglass icon is displayed to indicate this mode is active.
Hour Meter Mode
This mode logs the total hours the engine has been in operation. When viewing the engine hours, the hourglass icon (show below) will be displayed. Total engine hours cannot be reset.

Tachometer Mode
The engine RPM is displayed digitally. Small fluctuations in the RPM from day to day may be normal because of changes in humidity, temperature and elevation.
Programmable Service Interval
When the hours of engine operation equal the programmed service interval setting, the wrench icon will flash for 5 seconds each time the engine is started. When this feature is enabled, it provides a convenient reminder to perform routine maintenance. The service interval is programmed at 50 hours at the factory.
To change the service interval, do the following:
1. Press the MODE button until remaining service hours display. When viewing the service hours, the hourglass icon (shown below) and the wrench icon will display.
2. Press and hold the MODE button.
3. When the service hours flash, press and release the MODE button to advance the hours to the desired setting (including OFF). Press and hold the MODE button to set the new service hour interval.
Diagnostic Display Mode
The EFI diagnostic display mode is for informational purposes only. Your Polaris Dealer can provide assistance for all major repairs.
The diagnostic mode is accessible only when the check engine warning indicator activates after the key has been turned on. Leave the key on if you want to view the active code (failure code).
The diagnostic mode becomes inaccessible if the key is turned off and on and the warning indicator is no longer active. This allows the determination of persistent as well as intermittent faults.
Inactive codes are stored in the history of the unit.
Engine Error Codes
The error screen displays only when the CHECK ENGINE light is on or when it goes on and off during one ignition cycle. Error codes are not stored. When the key is turned OFF, the code and message is lost but will reappear if the fault reoccurs after restarting the engine.
If the CHECK ENGINE light illuminates, retrieve the error codes from the display.
1. If the error codes are not displayed, use the MODE button to toggle until "Ck ENG" displays on the main line of the display.
2. Press and hold the MODE button to enter the diagnostics code menu.
3. Record the three numbers displayed in the gear position, clock and odometer displays.
4. Press the MODE button to advance to the next error code.
5. Press and hold the MODE button to exit the diagnostics code menu.
6. Your authorized Polaris Dealer can provide code details and diagnosis.
For more information about your vehicle, consult your Owner's Manual.
Unless noted, trademarks are the property of Polaris Industries Inc.
© 2022 Polaris Inc.


