


Belt Break-In
A proper break-in of the drive belt on your Polaris Off-Road Vehicle will ensure a longer life and better performance. You can also break in any spare belts for your vehicle.
To break in a belt, use low gear (if available) while varying speeds and avoiding wide open throttle for 5 to 10 miles. If no low gear is available, vary at moderate speeds while avoiding wide open throttle for 50 miles.
Breaking in a belt is about more than a set number of miles and avoiding high engine RPM. It's about flexing the belt in the correct direction. The side faces need to wear and mate to the proper angle of the sheaves and wear into the correct friction. Cut belts are too sticky, while ground belts are too slippery when new. That wear needs to happen under low load and temperature. Belts run hotter when first installed and are more sensitive to high loads until they break in.
The goal of break-in is to achieve a high number of flex cycles under low load while maintaining low temperatures.
Belt Maintenance
Even with a proper break-in, it is possible to damage a belt with excessive heat or spin-burn. Many belts are damaged because of spin-burn or hourglassing, which is a result of not using low gear when tires are stuck in mud or sand or when loading or unloading your vehicle. An engine misfire often indicates belt slippage because of spin-burn.
Inspect your belt for hourglassing, which is extreme circular wear in at least one spot and on both sides of the belt. Hourglassing occurs when the drivetrain does not move and the drive clutch engages the belt.
An example of an hourglassed belt can be seen below.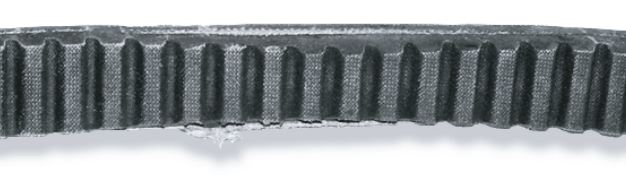
Jerky or hesitant drive-away or acceleration is another warning sign that it's time to inspect your belt. If your vehicle hits a peak RPM that is too high or the peak RPM begins to fade when your vehicle is held at wide-open throttle, it's likely that your belt has reached the end of its effective life.
Inspect your belt for loose cords, missing cogs, cracks, abrasions, thin spots or excessive wear. Compare belt measurements with a new drive belt, and replace if necessary.
Belts with thin spots, burn marks, etc., should be replaced to eliminate noise, vibration or erratic Polaris Variable Transmission (PVT) operation.
The following picture shows a belt with flex cracks.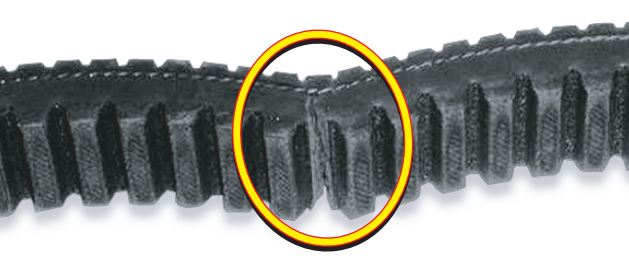
Drying a Wet Belt
There may be instances when water is accidentally ingested into the PVT system. Use the following instructions to dry it out before operating:
1. Position the vehicle on a level surface. Place the transmission in PARK.
2. Remove the drain plug from the outer clutch cover. Allow the water to drain completely. Reinstall the drain plug.
3. Start the engine.
4. Apply varying throttle for 10 to 15 seconds (we suggest 5-6,000 RPM) to expel the moisture and air-dry the belt and clutches. Do not hold the throttle wide open for more than 5 seconds.
5. Allow the engine RPM to settle to idle speed and then shift the transmission to low range.
6. Test for belt slippage. If the belt slips, repeat the process. Your vehicle requires service as soon as possible. See your authorized Polaris Dealer.
Belt Replacement
Polaris recommends using Polaris belts, which are designed and tested specifically for Polaris Off-Road Vehicles. See the following video for more on the benefits of using a Polaris belt and belt maintenance tips.
If a belt fails, always clean any debris from the PVT intake and outlet ducts and from the clutch, clutch covers, and engine compartments. Verify the clutch rollers are tight and rolling smoothly and the weights are not notched or loose. Ensure the seal on the clutch cover is in good shape, not twisted or torn, and installed correctly.
Washing a new drive belt before installation is not necessary. If you choose to wash your belt, use warm, soapy water and air dry the belt prior to use.
When installing a new belt, make sure it is oriented correctly. When the belt is on the vehicle, you should be able to read "POLARIS" and the part number as shown below: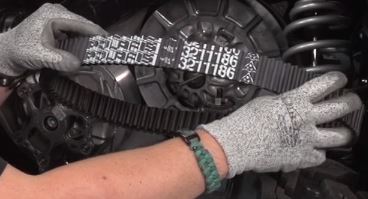
For more information on drive belt maintenance, listen to the All Things Drive Belt episode of the Polaris Podcast.
All break-in procedures for your vehicle can be found in your Owner's Manual.
Changing Your Drive Belt
The Help Center contains model-specific maintenance procedures. To find step-by-step videos for changing the drive belt on your Off-Road Vehicle, use the Help Center search bar above.
YouTube® is a registered trademark of Google LLC
Unless noted, trademarks are the property of Polaris Industries Inc.
© 2022 Polaris Industries Inc.


