


When using a plow system with your Polaris Off-Road Vehicle, keep the following tips in mind. Not only will they keep you safe, but they’ll increase the lifespan of your plow system and improve the quality of your plowing.
Before starting, think about the best direction to plow. Consider where you would like your snow piles and where water will go when snow melts. Start in the center and plow outward when possible. Minimize changes to blade angle, re-positioning and backing up as much as is realistic.
Be aware of possible hidden objects under the snow. Consider marking driveway borders and other obstacles before the ground freezes.
Plan ahead by pushing snow piles farther and plowing your driveway wider than its border, especially early in the winter. This will give you more room for the next snow storm and help to prevent drifting when the wind picks up. Old snow often turns to ice, which can be hazardous to have in the way of your plow or other vehicles.
Always wear the appropriate protective clothing as recommended in your vehicle’s Owner’s Manual, and be especially cautious of cold, snowy weather. Appropriate clothing can include a winter-rated helmet, insulated and water-resistant gloves, warm and layered clothing, insulated and slip-resistant boots, and fog-resistant eye protection such as helmet face-shields, goggles, or safety glasses.
Avoid piling snow on or near property lines, streets, sidewalks, road ditches, mailboxes, drains, electrical boxes, fire hydrants or across roads.
Carry a cell phone in case of emergency.
Vehicle Operation
Read the blade Owner’s Manual, your vehicle’s Owner’s Manual and all safety decals before operating the plow system.
Use low gear, All-Wheel Drive and do not exceed 5 mph (8 km/h) with the blade installed. Speed is the number one factor in damage to the plow, vehicle, and surroundings. Even with the blade up, operating at higher speeds can alter vehicle performance due to the weight of the plow.
Do not ram the blade into a snow pile. Slow down before contacting a pile. Come to a complete stop before shifting from forward to reverse. When plowing snow into a pile, start backing up before raising the blade.
Before adjusting the blade angle, stop the vehicle, place the gear selector in park, and then raise the blade with the winch or hydraulic lift. Do not attempt to raise the blade by hand.
Operate with caution, especially on slopes, grades and rough terrain.
Keep bystanders away from the blade and vehicle while in operation.
If you’ve installed your winch or plow for the first time, re-torque all bolts and nuts after the first 30 minutes of use and periodically throughout each season. Inspect your plow system before, during and after use. Look for loose parts, winch damage and snow/ice build-up. Be sure your plow is ready prior to the next big storm.
Do not allow riders on the blade or vehicle while plowing.
Never quickly and repeatedly tap or “jog” the winch switch up or down. This puts extra load on the winch, winch cable/rope and battery. It also generates excessive heat from the winch motor.
You’re likely to face cold and windy weather during plowing season. For ATVs and side-by-sides, accessories like windshields, heated seats and grips, handguards, handlebar gauntlets and full cabs can make your plowing much more enjoyable.
Winches with ropes are preferred over cables for plowing, as heavy use can shorten the life of a steel cable.
To offset plow weight, consider increasing the vehicle's front spring preload.
Remove the blade and plow frame before trail riding. Plow mounting reduces ground clearance.
When parking the vehicle, stop the engine, place the gear selector in park and lower the blade to the down position. This takes the weight of the plow off of the front suspension of the vehicle and removes pressure from the winch or hydraulic lift cylinder. A board, mat or cardboard can be placed between the lowered blade and your floor to reduce marks on your garage floor.
Plow Angle Adjustment
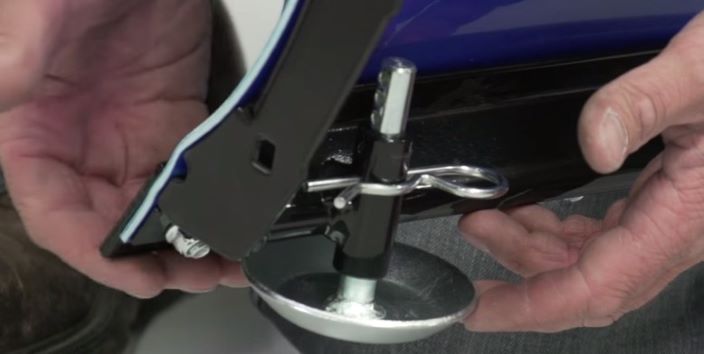
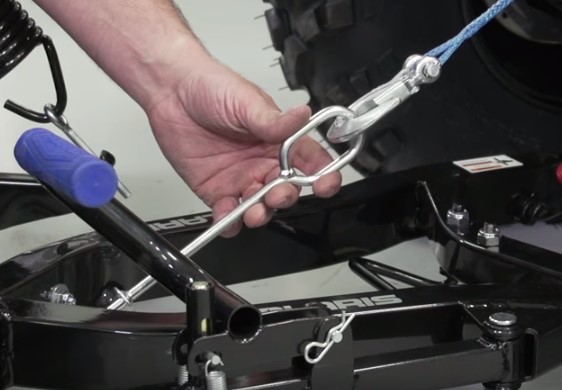
The angle of your plow blade can be adjusted so that it pushes snow to either side. To do this on a Glacier HD or Lock & Ride Glacier-II Plow Frame, lift the plow up with the winch to clear the ground. Rotate the shear pin handle on the pivot arm assembly to the unlocked position and pull up to disengage the shear pin. This will allow the plow to be angled to one of the pre-determined angles.
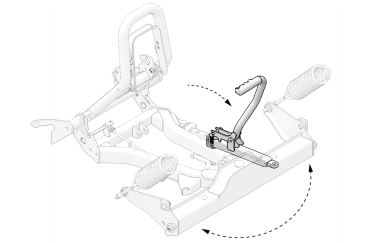
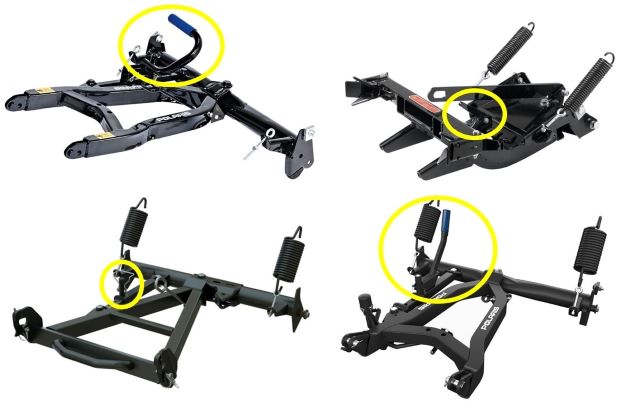
Once the plow is in the desired position, secure it in position by pushing the shear pin back down into one of the holes nearest your desired position and rotate the handle back into the locked position. Examples of different handles are shown below.
To adjust the angle on a Glacier Pro or Glacier Pro HD Plow Frame, raise the blade just enough to clear the ground. Pull the angle lever forward and pivot the blade to the desired position. Release the angle lever and the plow will lock itself into place when the blade is at the correct angle.
When riding the vehicle with the blade up, adjust the blade angle to the straight position to provide the most ground clearance. The straight position also can be helpful for back-dragging or cleaning up at the end of plowing.
Plow Stop Blocks Adjustment
The plow stop blocks can be used to make the plow more or less aggressive. This adjustment tips the top of the blade forward or back. To adjust the blade to be more or less aggressive, turn the four-position adjustable blade stops to the desired position. Plows come with the blocks set to the second position. A more aggressive position can be beneficial for scraping hard-packed snow. A less aggressive position will cause less impact to plowing surfaces.
1. Loosen the plow spring preload so there is no tension against the plow stops.
2. Loosen the plow stop retention nuts and rotate the stops to the desired setting. The stop sides are numbered 1 through 4 for easy identification. Make sure both the left and right stops are set to the same setting.
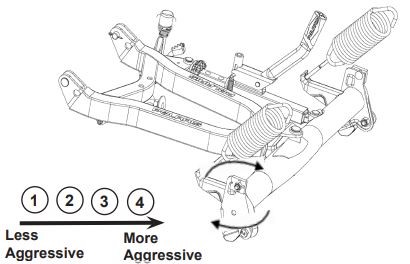
3. Tighten the plow stop retention nuts to secure the stops in place.
4. Tighten the plow springs to the desired setting. Always loosen the plow spring tension prior to adjusting the plow stop blocks to avoid injury.
Plow Springs Adjustment
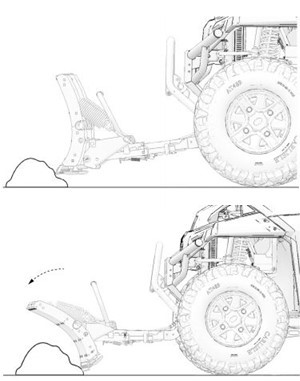
The plow is designed to trip forward when it hits a solid object to prevent damage to the plow blade or frame. When the pressure on the plow is released, it will return to its original position by itself. It is best to start with less tension and add tension if you notice the plow blade tripping forward too easily, like when contacting hard snow.
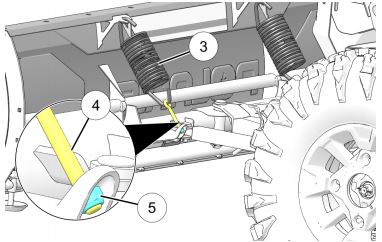
The plow springs (3) may be set stiffer by tightening the self-locking nuts (5) located at the ends of the eye bolts (4). For less tension, loosen the nuts. Make sure both the left- and right-hand spring are tensioned the same amount by measuring the number of threads showing.
Skid Shoes Adjustment
To adjust the distance between the cutting edge of your plow blade and the ground, raise or lower your skid shoes. This can help prevent damage to driveways, sidewalks or lawns. If you have a gravel yard or driveway, this also will prevent skimming off gravel while you’re moving snow.
Moving the skid shoe down will raise the blade, and raising the plow shoe will lower the blade. Make sure both the left- and right-hand skid shoes are adjusted to the same position.
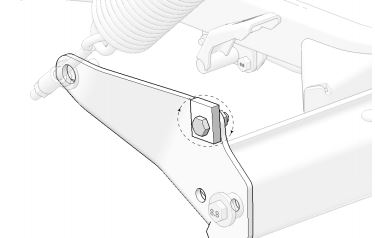
Winch Link
On some plow models the winch link can be adjusted by loosening or tightening the nut in order to control the maximum blade height when lifting with a winch and should be adjusted as shown in the plow installation instructions.
Wear Bar/Cutting Edge
The wear bar is attached to the bottom of the plow blade, protects the blade from wear and provides a cutting edge. The wear bar is reversible and can be removed, flipped upside down and reinstalled for additional life. After both sides become worn, the wear bar should be replaced.
Traction
To improve traction, you can use tire chains, add weight to the vehicle or take smaller paths with the plow blade. If using tire chains, add them to all four tires.
Taking a smaller path by using only half the blade width or plowing with the angle set as steep as possible means less snow weight on the blade and improves traction.
Tire chains help improve traction on icy surfaces, but be aware they can cause damage to lawns or driveways.
Adding weight to the vehicle racks or cargo areas can improve traction as well. Be sure to tie down extra weight or any cargo, and do not exceed recommended weight limits.
If heavy snow accumulation is expected, don’t wait until the storm is over. Because of the weight, plowing 6 inches of snow twice will give you better traction and better results than plowing 12 inches of snow once, especially when wind leads to deep drifts. If heavy or deep snow is affecting traction, raise the blade several inches off the ground to move the top layer, and then come back and lower the blade on a second pass.
As part of pre-ride inspection, verify proper tire pressure specific to your vehicle and tires.
For more snow plowing tips, listen to the The What, How and Why of Snow Plowing episode of the Polaris Podcast.
For more information, see your authorized Polaris Dealer. Find a dealer near you with the Dealer Locator.
Maintenance tips, procedures and specifications can be found in your Owner's Manual.
To find diagrams and replacement part numbers, use the online parts catalog.
Unless noted, trademarks are the property of Polaris Industries Inc.
© 2022 Polaris Industries Inc.


