


Prepping your Polaris ACE for storage starts with making any necessary repairs and washing the exterior of the vehicle. Keeping your ACE clean not only will improve its appearance, but it also can extend the life of various components.
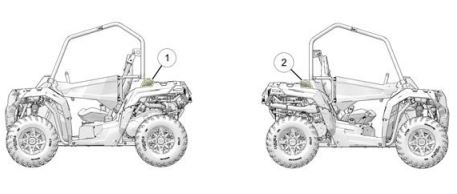
Note that water in the PVT system could cause the drive belt to become wet and slip in the clutches. Always avoid spraying water directly toward any intake pre-filters (1 and 2).
The best and safest way to clean your ACE is with a garden hose and a pail of mild soap and water.
- Use a professional-type washing cloth, cleaning the upper body first and the lower parts last.
- Rinse with clean water frequently.
- Dry surfaces with a chamois to prevent water spots.
Washing tips:
- Avoid the use of harsh cleaners, which can scratch the finish.
- Do not use medium to heavy duty compounds on the finish.
- Always use clean cloths and pads for cleaning and polishing. Old or reused cloths and pads my contain dirt particles that will scratch the finish.
- Grease all zerk fittings immediately after washing. Allow the engine to run for a while to evaporate any water that may have entered the engine or exhaust system.
- Certain products, including insect repellents and chemicals, will damage plastic surfaces. Do not allow these types of products to contact the vehicle.
If you use a pressure washer to clean your vehicle, do not aim the nozzle at sensitive components. The maximum pressure should not exceed 3000 PSI, 2.5 GPM with a 40° pressure washer nozzle. Make sure to keep the pressure washer nozzle 2 feet away from the vehicle. Exercise extreme caution. The water may damage components and could remove paint and decals. Avoid directing the water stream at the following items:
- Wheel bearings
- Radiator
- Transmission seals
- Cab and body panels
- Electrical components
- Switches and controls
- Fuel system components
- Labels and decals
- Instrument panels
If an informational or graphic label becomes illegible or comes off, contact your Polaris Dealer to purchase a replacement. Replacement safety labels are provided by Polaris at no charge.
Polaris recommends the use of common household aerosol furniture polish for polishing the finish on your Polaris vehicle. Follow the instructions on the container. Avoid the use of automotive products, some of which can scratch the finish of your vehicle. Always use clean cloths and pads for cleaning and polishing. Old or reused cloths and pads may contain dirt particles that will scratch the finish.
For more cleaning tips, listen to the Cleaning: It's Not Just About Looking Good episode of the Polaris Podcast.
Stabilize the Fuel
To stabilize the fuel in your ACE:
1. Fill the fuel tank.
2. Add Polaris Carbon Clean Fuel Treatment or Polaris Fuel Stabilizer or equivalent fuel treatments or stabilizers. Follow the instructions on the container for the recommended amount. Carbon Clean removes water from fuel systems, stabilizes fuel and removes carbon deposits from pistons, rings, valves and exhaust systems.
3. Allow the engine to run for 15 to 20 minutes to allow the stabilizer to disperse through the entire fuel delivery system.
Oil and Filter
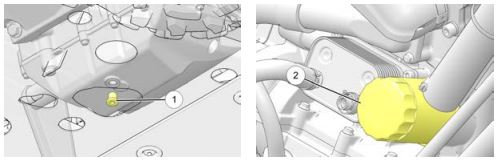
Change the oil and filter. Always change the oil filter whenever changing oil. The engine drain plug (1) is located on the bottom of the crankcase.
For more on the oil and filter change procedure, view the following model-specific instructions.
ACE 325
ACE 500 or ACE 570
ACE 900
ACE 150
Air Filter and Airbox
Change the air filter. Always clean all dirt and debris away from the airbox area before servicing the air filter.
To learn more about changing the air filter, view the following model-specific instructions.
ACE 325
ACE 500 or ACE 570
ACE 900
ACE 150
Fluid Levels
Inspect the fluid levels. Add or change fluids as recommended in the Periodic Maintenance Chart of your Owner's Manual.
- Demand drive fluid (front gearcase)
- Rear gearcase fluid (if equipped)
- Transmission fluid
- Brake fluid (change every 2 years and anytime the fluid looks dark or contaminated)
- Coolant (test strength/fill)
Inspect and Lubricate
Inspect all cables and lubricate all areas of the vehicle as recommended in the Periodic Maintenance Chart in your Owner's Manual.
Fog the Engine
1. Treat the fuel system with Polaris Carbon Clean or other equivalent fuel treatment. Follow the instructions on the container. Start the engine. Allow it to idle for several minutes so the Carbon Clean reaches the injectors. Stop the engine.
2. Remove the spark plugs and add 2 to 3 tablespoons of engine oil. To access the plug holes, use a section of clear 1/4-inch hose and a small plastic squeeze bottle filled with the pre-measured amount of oil. Do this carefully. If you miss the plug holes, oil will drain from the spark plug cavities into the hole at the front of the cylinder head and appear to be an oil leak.
3. Reinstall the spark plugs. Torque to specification.
4. Apply dielectric grease to the inside of each spark plug cap. Do not reinstall the cap onto the plug at this step.
5. Turn the engine over several times. Oil will be forced in and around the piston rings and ring lands, coating the cylinder with a protective film of fresh oil.
6. Reinstall the spark plug caps.
7. If Polaris fuel system additive is not used, fuel tank, fuel lines and injectors should be completely drained of gasoline.
Battery Maintenance
Whenever your ACE is not used for three months or more, remove the battery from the vehicle. Ensure that it’s fully charged and store it out of the sun in a cool, dry place. Check the battery’s voltage each month during storage and recharge it as needed to maintain a full charge.
Make sure to follow the instructions found in your Owner’s Manual for removing the battery.
A battery’s charge can be maintained by using a Polaris Battery Tender charger or by charging monthly to make up for normal self-discharge. The Battery Tender can be left connected during the storage period. It automatically will charge the battery if the voltage drops below a pre-determined point.
Improperly connecting or disconnecting battery cables can result in an explosion and cause serious injury or death. When removing the battery, always disconnect the negative (black) cable first. When reinstalling the battery, always connect the negative (black) cable last. Consult your Owner’s Manual for full details on battery removal, reinstallation and charging.
Storage Area and Covers
Be sure the storage area is well-ventilated. Cover the vehicle with a genuine Polaris cover. Do not use plastic or coated materials. They do not allow enough ventilation to prevent condensation and may promote corrosion and oxidation.
Learn More
To get even more advice and tips on storage, listen to the Put Your Toys Away, It's Time to Winterize episode of the Polaris Podcast.
Removal From Storage
- Check the battery electrolyte level and charge the battery if necessary. Install the battery in the vehicle. Make sure the battery vent hose is routed properly and that it's not pinched or restricted in any way.
- Make sure spark plugs are tight.
- Fill the fuel tank with fuel.
- Check all the points listed in the Daily Pre-Ride Inspection outlined in your Owner's Manual. Tightness of the bolts, nuts and other fasteners should be checked by an authorized Polaris Dealer.
- Lubricate at the intervals outlined in the Periodic Maintenance Chart in your Owner's Manual.
Note that engine exhaust contains poisonous carbon monoxide and can cause loss of consciousness or death. Never run an engine in an enclosed area.
For more on removing your vehicle from storage, listen to the Spring's Here; Get Out and Ride episode of the Polaris Podcast.
Additional maintenance tips and procedures can be found in your Owner's Manual.
Unless noted, trademarks are the property of Polaris Industries Inc.
© 2023 Polaris Industries Inc.


